
The Whitsundays are made up of about 74 tropical islands forming part of the Great Barrier Reef Marine Park (GBRMP). Most of the islands are national parks and therefore subject to laws and regulations.
The Great Barrier Reef acts as a natural barrier to create idyllic conditions for yacht cruising between the islands and there are literally dozens of safe, convenient anchorages throughout the archipelago, all within a couple of hours sailing.
The Whitsunday Islands reefs are outstanding for their coral cover and marine diversity. As a general rule, you must not damage coral. Make sure that you are causing the least damage possible by anchoring well away from coral whenever possible and following the responsible reef practices for anchoring.
INSERT GOOGLE MAP
Distance Guide (approx, nautical miles) From Coral Sea Marina to: Nara/Macona 13nm, Hayman Island 15nm, Hamilton Marina 16nm, Whitehaven 30nm, Cid Harbour 14nm, South Molle 9nm.
To estimate travel times: cruising under motor speed around 5kts (nautical miles per hour) allow extra time to anchor / pickup a mooring. e.g. Coral Sea Marina to Cid Harbour approx. 3 hours under motor, less if under sail in favorable wind conditions.
APPROVED ANCHORAGES
Approved Anchorages From “100 Magic Miles” 9th Edition
Note: Not all anchorages in the guide are approved for bareboats and many are only suitable for certain wind conditions. Please consult the list below to ensure the anchorage is approved for overnight stays and that conditions are suitable. If in any doubt, check with your radio operator.
Anchorages Suitable for Strong Winds (over 25 Knots)
N.B. These are the only anchorages permitted during a Strong Wind or Gale Warning
| No | Name | Map Ref | Anchorage | Note | Wind Protection |
| 1 | Coral Sea Marina | C1 | Marina | All weather | |
| 2 | Airlie Bay | C1 | 1 & 2 | SE S SW | |
| 3 | Long Is – Happy Bay | C4 | 1 | Mooring only | SE |
| 4 | Long Is – Palm Bay | C4 | Mooring only | SE S | |
| 5 | Nara Inlet | C10b | 1 & 3 | NW N NE E SE | |
| 6 | Macona Inlet | C10a | 2 | NW N NE E | |
| 7 | Cid Hbr – Sawmill Beach | C19 | 1 & 2 | E SE S SW | |
| 8 | Cid Hbr – Dugong Inlet | C19 | 3 | NW N NE | |
| 9 | Gulnare Inlet | C20 | 1 | Enter & leave 2nd half of rising tide | All weather |
| 10 | Hamilton Island | C22 | Marina | All weather |
HOLIDAY GUIDES
Note: The information in this anchorage guide is not be be used as a substitute for current navigation charts and information. While we try to keep this information up-to-date and correct, Charter Yachts Australia accepts no responsibility for any errors or omissions.
Overnight anchorages suitable for winds to 20 knots
| No | Name | Map Ref | Anchorage | Note | Wind Protection |
| 1 | Double Bay West | N12 | 1, 2 & 3 | E SE S SW W NW | |
| 2 | Double Bay East | N13 | 1, 2 & 3 | E SE S SW NW | |
| 3 | Woodwark Bay | N14 | 1, 2 & 3 | E SE S SW W | |
| 4 | Coral Sea Marina | C1 | Marina | All weather | |
| 5 | Airlie Bay | C1 | 1 & 2 | E SE S SW | |
| 6 | Funnel Bay | C2 | 1 | NE E SE S SW | |
| 7 | Long Is – Happy Bay | C4 | 1 | Anchor/moorings | NE E SE S SW |
| 8 | Long Is – Palm Bay | C4 | Mooring only | NE E SE S SW | |
| 9 | Daydream Is Sunlover Beach | C8 | Mooring only | Light winds only | |
| 10 | Sth Molle Is – Bauer Bay | C9 | E SE S SW | ||
| 11 | Nara Inlet | C10b | 1 & 3 | All weather | |
| 12 | Macona Inlet | C10a | 1 | NE E SE S SW | |
| 13 | Macona Inlet | C10a | 2 | All weather | |
| 14 | Stonehaven | C12 | 2 | Anchor/mooring | NE E SE S |
| 15 | Blue Pearl Bay | C13b | Moorings only | NE E SE | |
| 16 | Butterfly/Luncheon Bay | C14/15 | Moorings only | NE E SE S SW W NW | |
| 17 | Maureens Cove | C14/15 | Anchor/mooring | E SE S SW | |
| 19 | Mays Bay | C18 | 1 | E SE S | |
| 20 | Cid Harbour – Sawmill | C19 | 1 & 2 | NE E SE S SW | |
| 21 | Cid Hbr – Dugong Inlet | C19 | 3 | NW N NE E SE | |
| 22 | Gulnare Inlet | C20 | 1 | Enter & leave 2nd half of rising tide | All weather |
| 23 | Hamilton Island | C22 | Marina | All weather | |
| 24 | Turtle Bay | C24 | 1 2 3 & 4 | NW N NE | |
| 25 | Chance Bay | C25 | 1 & 2 | NW N NE | |
| 26 | Whitehaven Beach | C26 | 1 | E SE S SW W NW | |
| 27 | Chalkies Beach | C26 | 2 | Max 6 boats – extra care! | E SE |
| 28 | Tongue Bay | C27 | 1 | Anchor/mooring | SE S SW W NW |
| 29 | Cateran Bay | C29 | 1 | Anchor/mooring | E SE S SW |
| 30 | Windy Bay | C31 | 3 | E SE S SW | |
| 31 | Lindeman Is – Boatport | S1 | 3 | NE E SE | |
| 32 | – Gap Beach | S1 | 5 | SE S SW W | |
| 33 | – Plantation Bay | S2 | 1 | NW N NE E SE S | |
| 34 | Shaw Island – Neck Bay | S2 | 2 | NE E SE S | |
| 35 | – West | S3 | 1 | NE E SE S | |
| 36 | – Burning Pt | S3 | 3 | E SE S SW |
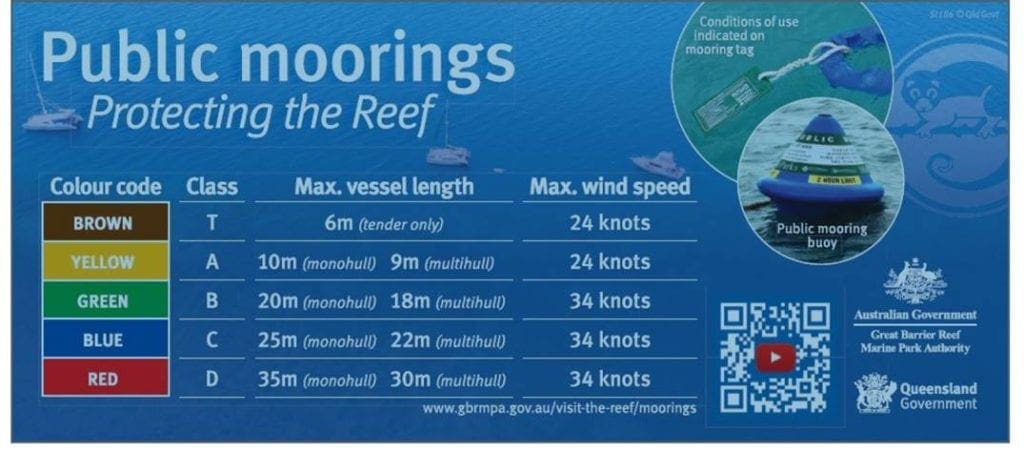
Public Moorings and Responsible Anchoring in the Great Barrier Reef
Heading out boating? All you need to know to utilise the system of public moorings in the Great Barrier Reef and help protect delicate coral from anchor damage.
The Great Barrier Reef and its spectacular island national parks are home to an abundant and diverse marine life, attracting thousands of visitors each year.
The magnificent corals are among the most popular attractions, yet they are the most vulnerable. Coral reefs can be damaged by:
• a vessel’s anchor and chain dropping or dragging on coral;
• a vessel grounding when the wind changes or the tide ebbs; and
• a chain or rope wrapping around coral and breaking pieces off.
Coral can be killed or damaged by anchoring. It may take many years for the coral to recover. Some coral never returns to its original condition.
Public moorings and reef protection markers have been installed in a number of locations throughout the Great Barrier Reef to reduce anchor damage.
The following is a brief overview of the public moorings throughout the Whitsunday Islands. For more information simply scan the barcode.